jQuery Autocomplete with multiple fileds in Asp.Net C#


This  article explains jQuery autocomplete with  multiple fields using Asp.Net C#.

Scenario :  Listing business titles for a specific city/state location.

Initially I used AJAX CONTROL TOOLKIT (ACT) but I ran in to many issues and finally decided to use jQuery approach which really saved my time.

You can Download the complete source code from here

Add jQuery assets on your page.

<link href="styles/jquery-ui.css" rel="stylesheet" type="text/css"/>
<script type="text/javascript" src="scripts/jquery.min.js"></script>
<script type="text/javascript" src="scripts/jquery-ui.min.js"></script>

jQuery Code for consuming web service.

<script type="text/javascript">
$(function () {
var search = $("#<%=txtSearch.ClientID%>");
var location = $("#<%=txtLocation.ClientID %>");
search.autocomplete({
    source: function (request, response) {
        $.ajax({
            url: '<%=ResolveUrl("~/") %>AutoCompleteService.asmx/GetKeyWords',
            data: "{ 'keyword': '" + search.val() + "', 'location' : '" + location.val() + "'}",
            dataType: "json",
            type: "POST",
            contentType: "application/json; charset=utf-8",
            dataFilter: function (data) { return data; },
            success: function (data) {
                if (data.d != null) {
                    response($.map(data.d, function (item) {
                        return {
                            value: item
                        }
                    }))
                }
            },
            error: function (XMLHttpRequest, textStatus, error) {
                //alert(textStatus);
            }
        });
    },
    minLength: 1
});

location.autocomplete({
    source: function (request, response) {
        $.ajax({
            url: '<%=ResolveUrl("~/") %>AutoCompleteService.asmx/GetLocations',
            data: "{ 'location': '" + location.val() + "'}",
            dataType: "json",
            type: "POST",
            contentType: "application/json; charset=utf-8",
            dataFilter: function (data) { return data; },
            success: function (data) {
                if (data.d != null) {
                    response($.map(data.d, function (item) {
                        return {
                            value: item
                        }
                    }))
                }
            },
            error: function (XMLHttpRequest, textStatus, errorThrown) {
                // alert(textStatus);
            }
        });
    },
    minLength: 1
});

});
</script>

Code-behind for ASMX class (don’t forget to uncomment  System.Web.Script.Services.ScriptService)

using System;
using System.Collections.Generic;
using System.Linq;
using System.Web.Services;
using System.Collections;

[WebService(Namespace = "http://tempuri.org/")]
[WebServiceBinding(ConformsTo = WsiProfiles.BasicProfile1_1)]
[System.Web.Script.Services.ScriptService]
public class AutoCompleteService : System.Web.Services.WebService {

public AutoCompleteService () {
}

IDictionary<string, string[]> LoadItems()
{
    IDictionary<string, string[]> items = new Dictionary<string, string[]>();

    items.Add("Newyork", new string[]
                                        {
                                            "Applebee's", "Apiary", "Brenda's French Soul Food","TGI Friday's","Cafe Venue"
                                        });

    items.Add("Los Angeles", new string[]
                                        {
                                            "Los 1", "Los 2", "Los 3","TGI Friday's","Cafe Venue"
                                        });

    items.Add("Las Vegas", new string[]
                                        {
                                            "Los 1", "Los 2", "Los 3","TGI Friday's","Cafe Venue"
                                        });

    return items;
}

[WebMethod]
public string[] GetKeyWords(string keyword, string location)
{
    var items = LoadItems();
    if (items != null && items.Count > 0)
    {
        //Get all items for a specific location
        var result = (from item in items
                        where item.Key.Equals(location, StringComparison.OrdinalIgnoreCase)
                        select item.Value)
                    .FirstOrDefault();

        //check whether the items start with the keyword
        return result.Where
                            (
                                o => o.StartsWith(keyword, StringComparison.OrdinalIgnoreCase)
                            ).ToArray<string>();
    }
    return null;
}

[WebMethod]
public string[] GetLocations(string location)
{
    var items = LoadItems();
    if (items != null && items.Count > 0)
    {
        //check whether the items start with the location
        return (from item in items
                        where item.Key.StartsWith(location, StringComparison.OrdinalIgnoreCase)
                        select item.Key).ToArray<string>();

    }
    return null;
}
}

You can Download the complete source code from here

Hope this help and If you have any comments, please feel free to write your feedback.

Thanks
Deepu


jQuery reorder list & saving in to database from Asp.Net C#


I have faced lot of challenges while using Ajax Toolkit control for re-ordering a list and saving to database.. After doing some R&D I’ve  found some nice samples which uses jQuery which is very light weight.The good part of jQuery is we can control the rendering marking.. with CSS and from the backed we don’t need any ViewState or any kind of mechanism..

You can Download the complete source code from here


To begin with reorder stuff add jQuery scripts to your aspx page.

<link rel="stylesheet" type="text/css" href="list-reorder.css" />
<script type="text/javascript" src="jquery-1.2.6.pack.js"></script>
<script type="text/javascript" src="jquery.disable.text.select.pack.js">
</script>
<script type="text/javascript" src="json2.js"></script>
<script type="text/javascript" src="jquery.listreorder.js"></script>

The sample code uses Unordered list and list view control.. Add a List view control in to asp.net page..inside UL markup use class name as “lists“.

Next is adding a attribute to <li> tag which help to identify the exact element you are ordering,  so I am adding attribute name as id and setting value as ItemId which fetching from DB column identity value.

<li id='<%# DataBinder.Eval(Container.DataItem, “ItemId“)%>’>

<ul class="lists">
<asp:ListView ID="lvNews" runat="server">
<LayoutTemplate>
<asp:Panel ID="itemPlaceHolder" runat="server" />
</LayoutTemplate>
<ItemTemplate>
<li id='<%# DataBinder.Eval(Container.DataItem, "ItemId")%>'>
<%# DataBinder.Eval(Container.DataItem, "Title")%></li>
</ItemTemplate>
<ItemSeparatorTemplate>
</ItemSeparatorTemplate>
</asp:ListView>
</ul>

Add following code in codebehind class for binding the data to list view control

using System;
using System.Collections.Generic;

public class News
{

public int ItemId { get; set; }
public string Title { get; set; }

internal static IList<News> GetNews()  //replace this method call with your db logic
{
return new List<News>
{
new News{ItemId=1,Title="News Title 1"},
new News{ItemId=2,Title="News Title 2"},
};
}

internal static void SaveReorderList(List<string> items) //replace this method call with your db logic
{
int order = 1;
string sql = string.Empty;
foreach (string item in items)
{
//replace with your sql statement.
sql = "update news set display_order = " + order + " where news_id = '" + item + "'";
order += 1;
sql = string.Empty;
}
}
}

public partial class jQueryReorder_Net_Default : System.Web.UI.Page
{
protected void Page_Load(object sender, EventArgs e)
{
if (!IsPostBack)
{
BindNews();
}
}

private void BindNews()
{
var news = News.GetNews();
lvNews.DataSource = news;
lvNews.DataBind();
}

[System.Web.Services.WebMethod]
public static string SaveReOrder(List<String> items)
{
try
{
News.SaveReorderList(items);
return string.Empty;
}
catch (Exception exp)
{
return exp.ToString();
}
}
}

Finally I am adding jQuery re-order script in to the page.

<script type="text/javascript">
$(document).ready(function() {
var options = {
itemHoverClass: 'itemHover',
dragTargetClass: 'dragTarget',
dropTargetClass: 'dropTarget',
useDefaultDragHandle: true
};

var lists = $('.lists').ListReorder(options);
var items = [];
lists.bind('listorderchanged', function(evt, jqList, listOrder) {
for (var i = 0; i < listOrder.length; i++) {
items[i] = $("ul li:eq(" + i + ")").attr('id');
}
});

$('#btnSave').click(function() {
if (items.length > 0) {
var jsonText = JSON.stringify({ items: items });
$.ajax({
type: "POST",
url: '<%=ResolveUrl("~/jQueryReorder.Net/")%>Default.aspx/SaveReOrder',
data: jsonText,
contentType: "application/json; charset=utf-8",
dataType: "json",
success: function() { $("#result").html("Reorder items saved successfully"); },
failure: function(msg) { alert(msg); }
});
}
else {
alert("Sorry you have not reorder any items");
}
});
});
</script>

When ever the list order changed the event get fired and loop through the entire list items and sets the attribute id value in to a array which will be converted later to JSON format and pass it to a web method for saving into database. Don’t forget to add method attribute as System.Web.Services.WebMethod in the reorder save method.

You can Download the complete source code from here

Hope this helps and If you have any comments, please feel free to write your feedback.

Thanks
Deepu

Silverlight Integration in MOSS 2007 with out WebPart


In this article I will walk you through how you can integrate a Silverlight application in Sharepoint with out using any webpart. (Download the STP file)


I will use one of  my existing silverlight slide show application for this demo..

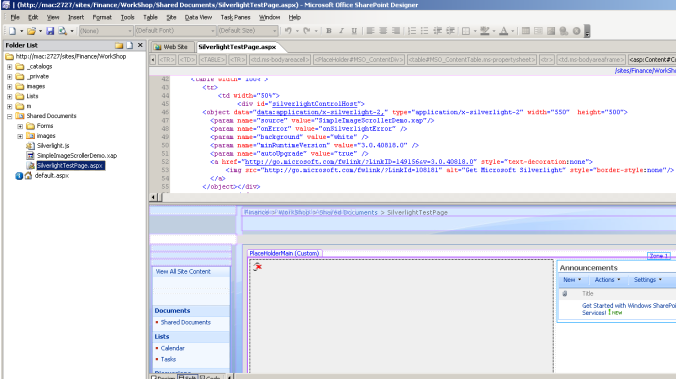
Upload your silverlight related files in the sharepoint repository,  here I  am uploading Silvrlight.js, Silverlight XAP file  and images folder in the Shared Document library


The next step is open the website in  SPD (Sharepoint Designer) and create a aspx page under Shared Documents library and add some markup code inside the content place holder (PlaceHolderMain) and copy paste the silverlight object and javascript code.

Save & preview the page in browser you should be able to see your Silverlight application running inside  Sharepoint..

Download the STP file

Hope this help and If you have any comments, please feel free to write your feedback.

Thanks
Deepu

Twitter Tweets in Asp.Net C#


I’ve been working on the twitter feed in one of my recent project where tweets getting updated on a regular interval time (say for every 30 minutes or 1 hr). I am creating this as a ASCX control so that I can reuse for multiple projects.

You can Download the complete source code from here

I am dropping a ListView control in the ASCX page which render the Twitter Profile name along with  Title, Description and Published date for the latest tweets.

Couple of properties need to configure to use this control

TwitterProfileName – Your twitter profile name or screen name

TweetsCount – No of tweets you want to return (default is 10).

<asp:ListView ID="lvTweets" runat="server">
<LayoutTemplate>
<table border="0" cellpadding="2" cellspacing="0">
<tr>
<td height="30" runat="server">
<a href="http://twitter.com/<%=<span class=&quot;hiddenSpellError&quot; pre=&quot;&quot;>TwitterProfileName</span>%>" target="_new"></a>
<%= TwitterProfileName%>
</td>
</tr>
<tr>
<td>
<asp:PlaceHolder ID="itemPlaceholder" runat="server" />
</td>
</tr>
<tr>
77B5D2;">
</td>
</tr>
</table>
</LayoutTemplate>
<ItemTemplate>
<tr>
<td>
<a target="_new" href='<%# DataBinder.Eval(Container.DataItem, "Link")%>'>
<%# DataBinder.Eval(Container.DataItem, "Title")%></a>
<br />
<div>
<%# DataBinder.Eval(Container.DataItem, "PublishedDate", "{0:h:mm  tt MMM d}")%>
</td>
</tr>
</ItemTemplate>
<EmptyDataTemplate>
<div>
<h3>
No tweets available.</h3>
</div>
</EmptyDataTemplate>
<ItemSeparatorTemplate>
<tr>
1px solid lightgrey;">
</td>
</tr>
</ItemSeparatorTemplate>
</asp:ListView>
using System;
using System.Linq;
using System.Xml.Linq;
using System.Collections;
using System.Collections.Generic;

public partial class TweetsControl : System.Web.UI.UserControl
{
private static DateTime? lastUpdated = null; //holds last updated time

private static XDocument xDoc = null; //static variable to store the result xml.

//Updates latest Tweets for every 10 minutes in page refresh.
private static Double Interval = 10;

//Determine its time to get the new tweets
private static Boolean IsTimeForUpdate
{
get
{
if (lastUpdated.HasValue && DateTime.Now > lastUpdated.Value.AddMinutes(Interval))
{
return true;
}
return false;
}
}

//Hold no of tweets default set it as 10.
public Int32? TweetsCount { get; set; }

//Twitter profile name or screen name.
public String TwitterProfileName { get; set; }

protected void Page_Load(object sender, EventArgs e)
{
if (!IsPostBack)
{
GetTweets();
}
}

private void GetTweets()
{
var xml = LoadXML();
IEnumerable query = null;
if (xml != null)
{
query = from e in xml.Descendants("item")
select new
{
Title = e.Element("title").Value,
Link = e.Element("link").Value,
PublishedDate = Convert.ToDateTime((e.Descendants("pubDate").First().Value)),
};
}
lvTweets.DataSource = query;
lvTweets.DataBind();
}

private XDocument LoadXML()
{
if (xDoc != null && !IsTimeForUpdate)
{
return xDoc;
}
else
{
try
{
TweetsCount = TweetsCount.HasValue ? TweetsCount : 10;
var url = string.Format("http://api.twitter.com/statuses/user_timeline.rss?screen_name={0}&count={1}", TwitterProfileName, TweetsCount);
xDoc = XDocument.Load(url);
lastUpdated = DateTime.Now;
return xDoc;
}
catch
{
return null;
}
}
}

}

Refer more api information on Twitter API

You can Download the complete source code from here

Hope this helps

Thanks
Deepu

using System; using System.Linq; using System.Xml.Linq; using System.Collections; using System.Collections.Generic; public partial class TweetsControl : System.Web.UI.UserControl { private static DateTime? lastUpdated = null; private static XDocument xDoc = null; private static Double Interval = 10; private static Boolean IsTimeForUpdate { get { if (lastUpdated.HasValue && DateTime.Now > lastUpdated.Value.AddMinutes(Interval)) { return true; } return false; } } public Int32? TweetsCount { get; set; } public String TwitterProfileName { get; set; } protected void Page_Load(object sender, EventArgs e) { if (!IsPostBack) { GetTweets(); } } private void GetTweets() { var xml = LoadXML(); IEnumerable query = null; if (xml != null) { query = from e in xml.Descendants(“item”) select new { Title = e.Element(“title”).Value, Link = e.Element(“link”).Value, PublishedDate = Convert.ToDateTime((e.Descendants(“pubDate”).First().Value)), }; } lvTweets.DataSource = query; lvTweets.DataBind(); } private XDocument LoadXML() { if (xDoc != null && !IsTimeForUpdate) { return xDoc; } else { try { TweetsCount = TweetsCount.HasValue ? TweetsCount : 10; var url = string.Format(“http://api.twitter.com/1/statuses/user_timeline.rss?screen_name={0}&count={1}”, TwitterProfileName, TweetsCount); xDoc = XDocument.Load(url); lastUpdated = DateTime.Now; return xDoc; } catch { return null; } } } }

Export Data Grid to Excel in Silverlight 4.0


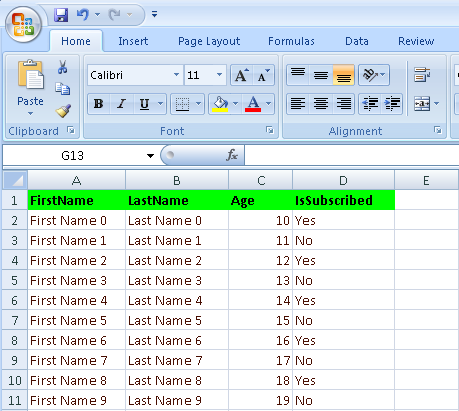
One of the great feature in Silverlight 4.0 is  COM interoperability, now your Silverlight application can talk with Office applications using Com Automation Factory. This feature requires a trusted application (elevated permissions). In this article I am going to explain how you can export your data from datagrid to excel spread sheet as  OOB (Out of browser) application using C# 4.0 magic keyword called “dynamic“.

You can Download the complete source code from here

Create a new Silverlgiht 4.0 project using VS 2010 and add Microsoft.CSharp as reference (for C# 4.0 dynamic keyword) and also the add the name space System.Runtime.InteropServices.Automation for  com interoperability

I am using a customer class with some getter and setter properties to bind the datagrid.

Customer Class


using System;
using System.Collections.Generic;
using System.Windows;
using System.Windows.Controls;
using System.Runtime.InteropServices.Automation;

 public class Customer
 {
 public string FirstName { get; set; }
 public string LastName { get; set; }
 public int Age { get; set; }
 public bool IsSubscribed { get; set; }
 }

Method for Binding customer list to the Data Grid

 public ExportToExcel()
 {
 InitializeComponent();
 BindDataGrid();
 }

 void BindDataGrid()
 {
 int count = 10;
 List<Customer> customers = new List<Customer>();
 for (int i = 0; i < count; i++)
 {
 customers.Add(new Customer()
 {
 FirstName = "First Name " + i,
 LastName = "Last Name " + i,
 Age = i + 10,
 IsSubscribed = (i % 2 == 0)
 });
 }
 dgCustomers.ItemsSource = customers;
 }

Method for exporting data from data grid to excel spread sheet

 void GenerateSpreadSheet(object sender, RoutedEventArgs e)
 {
 int rowIndex = 1;
 int coulmnIndex = 1;

 try
 {
 dynamic excel = AutomationFactory.CreateObject("Excel.Application");

 excel.workbooks.Add();

 dynamic sheet = excel.ActiveSheet;

 for (int i = 0; i < dgCustomers.Columns.Count; ++i)
 {
 dynamic headerCell = sheet.Cells[rowIndex, coulmnIndex + i];
 headerCell.Value = dgCustomers.Columns[i].Header;
 headerCell.Font.Bold = true;
 headerCell.Interior.Color = 0xFF00;
 }

 foreach (Customer customer in dgCustomers.ItemsSource)
 {
 rowIndex++;

 //column 1
 dynamic cellFirstName = sheet.Cells[rowIndex, 1];
 cellFirstName.Value = customer.FirstName;
 cellFirstName.Font.Color = 003399;

 //column 2
 dynamic cellLastName = sheet.Cells[rowIndex, 2];
 cellLastName.Value = customer.LastName;
 cellLastName.Font.Color = 003399;

 //column 3
 dynamic cellAge = sheet.Cells[rowIndex, 3];
 cellAge.Value = customer.Age;
 cellAge.Font.Color = 003399;

 //column 4
 dynamic cellSubscribed = sheet.Cells[rowIndex, 4];
 cellSubscribed.Value = customer.IsSubscribed ? "Yes" : "No";
 cellSubscribed.Font.Color = 003399;
 }
 excel.Visible = true;
 }
 catch (Exception ex)
 {
 MessageBox.Show("Error generating excel: " + ex.Message);
 }
 }

The xaml code creates a data grid and a button

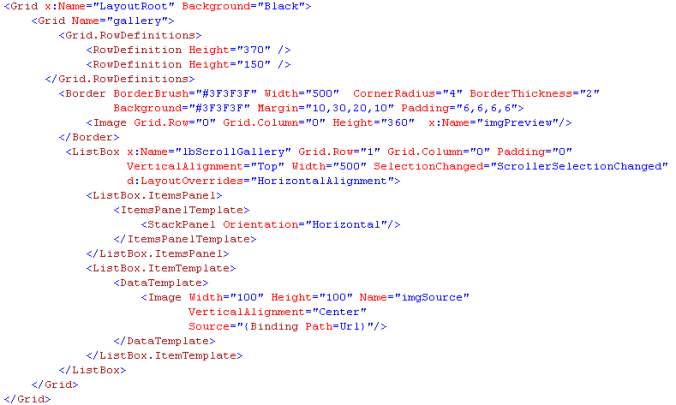
<Grid x:Name="LayoutRoot" Background="White">
 <Grid.RowDefinitions>
 <RowDefinition Height="350"></RowDefinition>
 <RowDefinition Height="5"></RowDefinition>
 <RowDefinition Height="25"></RowDefinition>
 <RowDefinition Height="*"></RowDefinition>
 </Grid.RowDefinitions>
 <my:DataGrid x:Name="dgCustomers" Grid.Row="0" AutoGenerateColumns="True" HeadersVisibility="All"
 RowBackground="Azure" AlternatingRowBackground="LightSteelBlue" ColumnWidth="85" RowHeight="30">
 </my:DataGrid>
 <Button  Grid.Row="2" Content="Export To Excel" Height="25" Width="120" Name="btnExportExcel" Click="GenerateSpreadSheet"  />
 </Grid>

Out of Browser set up

It is really easy to make a Silverlight applicaton as run out of browser mode. Right click the Silverlight project, select properties and check the ENABLE RUNNING APPLICATION OUT OF THE BROWSER.

Elevated permissions (Trusted Application)

Right click Silverlight Project – > Select Properties – > Click Out-Of-Browser Settings

You can Download the complete source code from here

Hope this help and If you have any comments, please feel free to write your feedback.

Thanks
Deepu

Google Spell Checker Api Asp.Net C#


In this article you will learn how to use the Google Spell Checker API in Asp.Net C# apps

Download the complete source code from here

The API is very simple,  spell checking is done through a XML http post to the following url

https://www.google.com/tbproxy/spell?lang=en:

Request XML structure

<?xml version=”1.0encoding=”utf-8?>
<spellrequest textalreadyclipped=”0ignoredups=”0ignoredigits=”1ignoreallcaps=”1>
<text>Hotal</text>
</spellrequest
>

The folloing are the Response XML from Google API

<?xml version=”1.0encoding=”UTF-8?>
<spellresult error=”0clipped=”0charschecked=”12>
<c o=”0l=”5s=”0″>
Hotel Hotly Total Ital Hots</c>
<
/spellresult
>

Tag Description
o The offset from the start of the text of the word
l Length of misspelled word
s Confidence of the suggestion
text Tab delimited list of suggestions

See the complete code here

using System;
using System.Net;
using System.Text;
using System.Text.RegularExpressions;

public static class SpellChecker
{
 public static String DidYouMean(string word)
 {
 string retValue = string.Empty;
 try
 {
 string uri = "https://www.google.com/tbproxy/spell?lang=en:";
 using (WebClient webclient = new WebClient())
 {
 string postData = string.Format("<?xml version=\"1.0\" encoding=\"utf-8\" ?><spellrequest textalreadyclipped=\"0\" ignoredups=\"0\" ignoredigits=\"1\" "
 + "ignoreallcaps=\"1\"><text>{0}</text></spellrequest>",word);

 webclient.Headers.Add("Content-Type", "application/x-www-form-urlencoded");
 byte[] bytes = Encoding.ASCII.GetBytes(postData);
 byte[] response = webclient.UploadData(uri, "POST", bytes);
 string data = Encoding.ASCII.GetString(response);
 if (data != string.Empty)
 {
    retValue = Regex.Replace(data, @"<(.|\n)*?>", string.Empty).Split('\t')[0];
 }
 }
 }
 catch (Exception exp)
 {

 }
 return retValue;
 }
 }

protected void Page_Load(object sender, EventArgs e)
{
    string word = SpellChecker.DidYouMean("Hotal");
    if(word != string.Empty)
    {
         labMessage.Text = "<font style='font-size:12px;color:red;'>Did you mean </font><b>" + retValue + "</b>";
    }
}

You can Download the complete source code from here

Hope this help and If you have any comments, please feel free to write your feedback.

Thanks
Deepu

Asp.Net 4.0 URL Routing


It’s been  really easy  in Asp.Net 4.0 for building SEO friendly URL applications with VS 2010. In one my previous article I have explained how we can achieve the same in Asp.Net 3.5  (check it out).  In Asp.Net 3.5 we need to implement the IRouteHandler interface in custom route handler class and bla bla….but now in Asp.Net 4.0 we do not need all extra code.  I am following the same example in my previous article here.  In the Global.asax file I am registering the routes some thing like below

You can download the entire article from here

Global.asax file Configuration

Add Import directive to Import System.Web.Routing name space

<%@ Import Namespace=”System.Web.Routing” %>

void RegisterRoutes(RouteCollection routes)
 {
 routes.MapPageRoute(
 "member-list",
 "member/{name}",
 "~/member-list.aspx"
 );
 }

 void Application_Start(object sender, EventArgs e)
 {
RegisterRoutes(RouteTable.Routes);
}

The first parameter member/{name} which denote the url structure, here the url which starts /member/{name} (ex : /member/deepu/) will point physically to the following path ~/member/member-list.aspx

Create a aspx page called default.aspx

This page will have a list of Members in Tabular format. I am going to use asp.net List view control to achieve this.

<asp:ListView ID=”lvUserList” runat=”server”>
<LayoutTemplate>
<table width=”50%” style=”background-color: lightgrey;” cellpadding=”2″ cellspacing=”1″
border=”0″>
<tr style=”background-color: white”>
<td width=”100″ align=”center”>
Member ID
</td>
<td align=”center”>
Name
</td>
<td width=”75″ align=”center”>
Blog
</td>
<td width=”50″>
</td>
</tr>
<asp:PlaceHolder ID=”itemPlaceholder” runat=”server” />
</table>
</LayoutTemplate>
<ItemTemplate>
<tr style=”background-color: white”>
<td align=”center”>
<asp:Label ID=”lab” Text='<%# DataBinder.Eval(Container.DataItem, “MemberID”)%>’
runat=”server” />
</td>
<td>
<asp:Label ID=”Label1″ Text='<%# DataBinder.Eval(Container.DataItem, “Name”)%>’ runat=”server” />
</td>
<td align=”center”>
<a target=”_blank” href='<%# DataBinder.Eval(Container.DataItem, “BlogURL”)%>’>Blog</a>
</td>
<td align=”center”>
<a href=”<%= ResolveUrl(“~/member/”)%><%# DataBinder.Eval(Container.DataItem, “Name”)%>”>
Detail</a>
</td>
</tr>
</ItemTemplate>
<ItemSeparatorTemplate>
<br />
</ItemSeparatorTemplate>
</asp:ListView>

Default.aspx.cs code behind

public partial class Memeber
{
 public int MemberID { get; set; }
 public string Name { get; set; }
 public string BlogURL { get; set; }
}


public partial class _Default : System.Web.UI.Page
{
 protected void Page_Load(object sender, EventArgs e)
 {
 if (!IsPostBack)
 {
 BindUsers();
 }
 }

 void BindUsers()
 {
 var items = new List<Memeber>()
 {
 new Memeber {MemberID = 1,Name = "Deepu", BlogURL = "https://deepumi.wordpress.com"},
 new Memeber {MemberID = 2,Name = "Scott", BlogURL = "http://weblogs.asp.net/scottgu/"},
 new Memeber {MemberID = 3,Name = "Joe", BlogURL = "http://misfitgeek.com"},
 };


 lvUserList.DataSource = items.ToList();
 lvUserList.DataBind();
 }
}

We have completed the listing page. The next page will be the detail page which will be rendering the member name for the URL routing.

Member-List.aspx Page

<asp:Content ID=”BodyContent” runat=”server” ContentPlaceHolderID=”MainContent”>
Member Name : <asp:Label ID=”labMemberName” runat=”server” />
</asp:Content>

Member-List.aspx code behind Page

var name = Page.RouteData.Values["name"];
 if (name != null)
 {
 Page.Title = name.ToString();
 labMemberName.Text = name.ToString();
 }

You can download the entire article from here

Hope this help and If you have any comments, please feel free to write your feedback.

Thanks
Deepu

Simple Image Scroller Slide Show using Silverlight ListBox control


Last week I was working on a image scroll-er slide show using silverlight listbox control and it worked great and I thought I’d  share this.

Click here to view the live demo (images may take a while to load)
Click here to download the article

If you find the Image Scroller code library useful, please consider donating

Xaml C# Code

public class ImageScroller
 {
 public string Url { get; set; }
 }

 public partial class ImageGallery : UserControl
 {
 int index = 0;

 void StartSlideShow()
 {
 DispatcherTimer timer = new DispatcherTimer();
 timer.Interval = TimeSpan.FromMilliseconds(2500); //delayed for 2.5 seconds
 timer.Tick += (sender, e) =>
 {
 lbScrollGallery.ScrollIntoView(lbScrollGallery.Items[index]); //scroll to the current item
 lbScrollGallery.SelectedIndex = index; //highlight the selected item in the list box scroller
 ImageScroller item = (ImageScroller)lbScrollGallery.Items[index]; // getting the current item
 imgPreview.Source = new BitmapImage(new Uri(item.Url, UriKind.Relative));
 if (index < lbScrollGallery.Items.Count - 1)
 {
 index++;
 }
 else
 {
 lbScrollGallery.ScrollIntoView(lbScrollGallery.Items[0]); //scroll to the first item
 index = 0; //reset the index when it reaches to the last item
 }
 };
 timer.Start();
 }

 public ImageGallery()
 {
 InitializeComponent();
 LoadImages();
 StartSlideShow();
 }

 void LoadImages()
 {
 lbScrollGallery.ItemsSource = new List<ImageScroller>
 {
 new ImageScroller
 {
 Url = "images/Chrysanthemum.jpg"
 },
 new ImageScroller
 {
 Url = "images/Desert.jpg"
 },
 new ImageScroller
 {
 Url = "images/Hydrangeas.jpg"
 },
 new ImageScroller
 {
 Url = "images/Jellyfish.jpg"
 },
 new ImageScroller
 {
 Url = "images/Koala.jpg"
 },
 new ImageScroller
 {
 Url = "images/Lighthouse.jpg"
 },
 new ImageScroller
 {
 Url = "images/Penguins.jpg"
 },
 new ImageScroller
 {
 Url = "images/Tulips.jpg"
 }
 };

 imgPreview.Source = new BitmapImage(new Uri("images/Chrysanthemum.jpg", UriKind.Relative)); //load default image while page loads
 }

 void ScrollerSelectionChanged(object sender, SelectionChangedEventArgs e)
 {
 ListBox listbox = (ListBox)sender;
 ImageScroller item = (ImageScroller)listbox.SelectedItem;
 if(item != null && ! string.IsNullOrEmpty(item.Url))
 {
 imgPreview.Source = new BitmapImage(new Uri(item.Url, UriKind.Relative));
 index = listbox.SelectedIndex;
 lbScrollGallery.ScrollIntoView(lbScrollGallery.Items[index]);
 }
 }
 }

Hope this help and If you have any comments, please feel free to write your feedback.

Click here to view the live demo (images may take a while to load)

You can download the entire article from here

If you find the Image Scroller code library useful, please consider donating

Thanks
Deepu

Loading User Controls Dynamically in Silverlight


When you develop Silverlight web sites you may need to change the content that’s shown in the Silverlight page programmatically, normally changing the layout controls or child controls etc..

In the above image you can see three navigation button’s and when you press each button the content will load dynamically from each separate user control XAML file (shown right side of the image) and render the content inside the canvas.

The below few lines of code which loads the control loading  dynamically and render in to the canvas control

 Type type = this.GetType();
 Assembly assembly = type.Assembly;
 UserControl newPage = (UserControl)assembly.CreateInstance(type.Namespace + "." + "ControlName"); //replace with your user control class name
 canvasBody.Children.Clear();
 canvasBody.Children.Add(newPage);

In the each  button control I am setting the datacontext attribute value as the User Control Class Name ie DataContext=”HomeControl”

XAML Markup

<Canvas Grid.Row="0" Grid.Column="0" Background="Black">
<Button Width="100" DataContext="HomeControl" Canvas.Top="50" Click="Navigation_Click" Canvas.Left="25" Content="Home"/>
<Button Width="100" DataContext="AboutControl" Canvas.Top="50" Click="Navigation_Click" Canvas.Left="140" Content="About"/>
<Button Width="100" DataContext="ContactControl" Canvas.Top="50" Click="Navigation_Click" Canvas.Left="255" Content="Contact"/>
</Canvas>

<Canvas Name="canvasBody" Grid.Row="1"  Grid.Column="0" Background="Black" />

Code behind

 public DefaultPage()
 {
 InitializeComponent();
 RenderControl("HomeControl"); //load default control for home page.
 }

 private void Navigation_Click(object sender, RoutedEventArgs e)
 {
 Button btn = sender as Button;
 if (btn != null && btn.DataContext != null)
 {
     RenderControl(btn.DataContext.ToString());
 }
 }

 void RenderControl(string currentControl)
 {
 Type type = this.GetType();
 Assembly assembly = type.Assembly;
 UserControl newPage = (UserControl)assembly.CreateInstance(type.Namespace + "." + currentControl);
 canvasBody.Children.Clear();
 canvasBody.Children.Add(newPage);
 }

Hope this will help and If you have any comments, please feel free to write your feedback.

Thanks
Deepu
Multiple file uploading in Silverlight


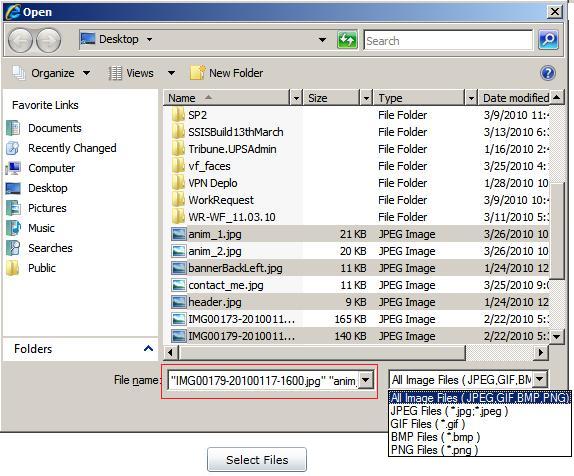
In this article I am going to explain how we can upload multiple files in Silverlight 3.0 using OpenFileDialog class

Click here to download the article

Open VS 2008 and create a new Xaml file called MultiFileUploader.xaml. Copy paste the below markup.

<Canvas Width=”640″>

<TextBlock Canvas.Left=”300″ HorizontalAlignment=”Center” Canvas.Top=”150″ x:Name=”txtProgress”  Foreground=”Green” Width=”120″/>

<Button Canvas.Left=”300″ HorizontalAlignment=”Center” Canvas.Top=”180″ Click=”FileUpload_Click” Width=”100″ Height=”25″ Content=”Select Files”/>

</Canvas>

In above Xaml I have placed two controls ie Button and Textbox.  Button control for selecting files and Texbox control,
shows the total file count which is uploaded in the server.

Code behind for MultiFileUploader.xaml.cs

int totalFilesToUpload = 0;
int totalFilesUploaded = 0;

private void FileUpload_Click(object sender, RoutedEventArgs e)
 {
 this.txtProgress.Text = string.Empty;

 OpenFileDialog oFileDialog = new OpenFileDialog();
 oFileDialog.Filter = "All Image Files ( JPEG,GIF,BMP,PNG)|*.jpg;*.jpeg;*.gif;*.bmp;*.png|JPEG Files ( *.jpg;*.jpeg )|*.jpg;*.jpeg|GIF Files ( *.gif )|*.gif|BMP Files ( *.bmp )|*.bmp|PNG Files ( *.png )|*.png";
 oFileDialog.FilterIndex = 1;
 oFileDialog.Multiselect = true;

 string data = string.Empty;

 if (oFileDialog.ShowDialog() == true)
 {
 foreach (var file in oFileDialog.Files)
 {
 using (System.IO.Stream fileStream = GetFileData(file.OpenRead()))
 {
 StreamResourceInfo oStreamResource = new StreamResourceInfo(fileStream, null);

 byte[] array = new byte[oStreamResource.Stream.Length];

 oStreamResource.Stream.Read(array, 0, (int)oStreamResource.Stream.Length);

 data = Convert.ToBase64String(array);

 WebClient oWebClient = new WebClient();

 string fileName = Guid.NewGuid().ToString().Replace("-", "") + file.Extension;

 oWebClient.UploadStringAsync(new Uri("http://localhost:50848/FileUpload.ashx?file=" + fileName), null, data, fileName);

 oWebClient.UploadProgressChanged += new UploadProgressChangedEventHandler(oWebClient_UploadtxtProgressChanged);

 totalFilesToUpload += 1;

 data = string.Empty;
 }
 }
 }

 }

 System.IO.MemoryStream GetFileData(System.IO.Stream oFileStream)
 {
 oFileStream.Seek(0, System.IO.SeekOrigin.Begin);
 byte[] data = new byte[oFileStream.Length];
 oFileStream.Read(data, 0, (int)oFileStream.Length);
 return new System.IO.MemoryStream(data);
 }

 void oWebClient_UploadtxtProgressChanged(object sender, UploadProgressChangedEventArgs e)
 {
 totalFilesUploaded += 1;

 txtProgress.Text = !string.IsNullOrEmpty(txtProgress.Text) ? (int.Parse(txtProgress.Text) + e.BytesSent).ToString() : e.BytesSent.ToString();

 if (totalFilesUploaded == totalFilesToUpload)
 {
 txtProgress.Text = totalFilesUploaded + " files uploaded successfully (" +  txtProgress.Text + " bytes sent )";
 }
 }

The next step I am going to create a receiver application which can convert the stream object to image file and save to server. I am creating a GenericHandler  file to achieve this task (You can do it in Aspx page also).

using System;
using System.Web;
using System.IO;

namespace SilverlightApplicationDemo.Web
{
    public class FileUpload : IHttpHandler
    {

        public void ProcessRequest(HttpContext context)
        {
            var fileName = context.Request["file"];
            string data;
            using (StreamReader sr = new StreamReader(context.Request.InputStream))
            {
                data = sr.ReadToEnd();
                byte[] array = Convert.FromBase64String(data);
                using (FileStream fs = new FileStream(context.Server.MapPath("~/images/") + fileName, FileMode.Create))
                {
                    fs.Write(array, 0, array.Length);
                }
            }

        }

        public bool IsReusable
        {
            get
            {
                return false;
            }
        }
    }
}

Note :  I have hard-coded the FileUpload url as (http://localhost:50848/FileUpload.ashx). Don’t forget to replace with your file  upload URL.

Hope this help and If you have any comments, please feel free to write your feedback.

You can download the entire article from here

Thanks
Deepu